 Yup there it is... and this picture does not do it justice. I have to say I am very happy with the way it turned out. I have never chosen orange (my least favorite of the basic colors) ... err... Butternut squash as a color for the walls before and I have to admit the only reason I went with shades of orange is because it is (in color theory) the color that inspires creativity the most out of all the basic colors.
There are six shades of orange in this room from the floor to the center of the ceiling. All blended one into the other. There are hints of red blended over the orange in the corners too. Splatters of red, antique gold and white on the walls. The leaves and flowers are 3D (about 1/4" thick) and covered with a mix of the antique gold and red. The flourishes were created by using four large 8' x 4' masks I created from some clip-art printed poster size and contact paper. Here are the pics to show the steps...
 The base coats of six shades of orange... If you try this fading finish please learn from my mistakes and DO NOT leave a crisp clean line to try to fade later... make if a fuzzy line as your brush runs out of paint. (pic on left)
The next pic is of the mask I created. I designed a flourish for the corners of each wall, (two designs per corner of the room one for each side of the corner). This was done by printing sections of the design in poster form off the computer. Then spraying the backing of the contact paper with spray adhesive. Gluing the papers in order onto the contact paper. Then cutting out the flourish design. Sticking it onto the primed wall, lining it up in the corners. It worked best when I only cut a 4x2 image of 4 sheets of 8 1/2" x 11" paper. This pic shows eight sections... turned out to be to much to handle when it was sticky and trying to line it all up on the wall.
 Trust me ... do it 2x2 not 4x2. When applying the mask make sure you use a brayer or some other tool to help press it onto the wall and get the best seal as possible. (pic above)
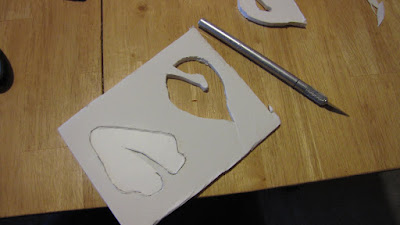
After the mask was in place I created the 3D templates. Using foam core board I cut out the leaves and flowers that printed with the images. (pic above)
This other one shows part of the mask on the wall, look closely it is white on white. It also shows the 3D template in action with some color changing drywall Spackle that I used to fill the template. After filling it I let them dry for about 20-30 min and then ran an exacto knife around the edges to loosen the grip the putty had on the template. Then created some more and repeated the process. This 3D image took about 24-30 hrs to dry. Then it needed to be primed and painted to match the base color that was going in that section of wall. There are 14 flowers and 24 leaves in the entire room. (lower left pic) This was worse then watching paint dry. All and all it took me several days to just get this far. But I have to say it was totally worth it! (pic above)
 This next pic shows how we divided up the fading on the ceiling. On the walls it was striped and the ceiling we did circles for a more natural look since the light is centered they compliment each other.
To draw the circles on the ceiling we used the light as an anchor and tied a sting around it then measured out where we wanted the circle to be. Tied a pencil on the other end of the string and drew around the room using the ladder to reach. Keeping the pencil at the same point tied to the sting. Like a campus. It worked great for creating guidelines and in the end looks perfect with the lighting.
To fade or blend each shade of orange I took the darker color and added some faux finishing glaze to it, about 3/1 glaze and paint (read the label and test it in a corner first). I painted it over the line, just above the matching color, for about 1' above the line and 3"-4" below it. Then wiped it off a bit around the edges with a cheese cloth (found at your local hardware store). This thinned out the glaze and helped blend the colors. I repeated this 4 more times, each time mixing a new color shade with glaze and then painting and wiping off. When you add a glaze to paint it extends the dry time creating a larger window of "open time" on the wall where you can play with the paint before it will dry. This step too about 24-30 hrs to completely dry with no tacky spots. Possibly having to repeat it due to my strait, crisp and clean lines I painted when switching shades.
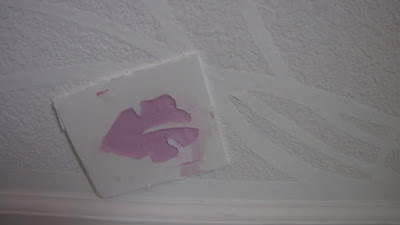
 Once I was satisfied with the blending and fading my daughter and I had some fun. We tossed and flinged three different colors of paint onto the walls, red, antique gold and white. Splattering and giggling it was great to allow her to be a part of the most complex design I have ever painted.
After it was all said and done she looked tore up! She had more paint on her then she got on the walls! The antique gold looked like a muddy brown mess and then the red looked like chicken pox and the white looked like calamine lotion for the chicken pox. It was so cute I had to grab a pic of her... she chose to pose this way... LOL.
 (pic below)
I know this post is long but I promise you it is almost done.
After flinging the paint onto the wall we began to peel off the contact paper mask. It reveled beautiful white flourishes in primer... so I had to paint it with a white. Tedious? Yes but necessary. Like almost every textured surface when tape is used there is never a clean edge.

The orange had been sucked under in several spots and parts needed repair where the delicacy of the mask did not allow it to stick while being painted and glazed over. (small pic on the right)
I then added the red and gold glaze mixture to the flowers and leaves. After this step I looked back from the door and decided it was done. So time to clean up and get a fresh white coat of paint on the thoroughly covered, multi colored base boards. It was now time to move in the furniture and begin to unpack my nine boxes of scrapy stuff!

I hope you enjoyed this post and I will be posting more once the room is unpacked, decorated and ready for some scrappy business. Have a blessed day!

one word -- WOW. this is a very beautiful room. and your daughter is very pretty! :)
ReplyDelete